Monday, March 8, 2010

Changing sequence and adding new menu items in SharePoint

Changing sequence and adding new menu items in SharePoint

Hi All,

As I have explained you in my previous post about the menu items in the toolbar on AllItems.aspx page. We will take the same code and sample here and I will explain you today how to play with the Menu items inside the menus.

So this post is all about changing the sequence of menu items and adding new menu items.

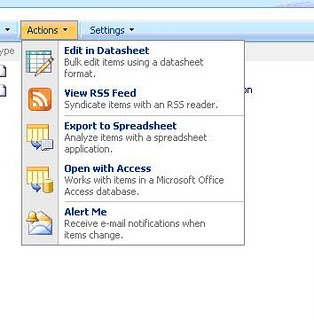
First let me show you how you can change the position of individual items in the menu. Considering we are playing with Actions menu and we want to change the "View RSS Feed" to appear with the Edit in Datasheet option.

Ok, let me clarify one thing very clearly. We should not change the default place of menu items as they are actually categorized properly and they have been placed in respective group items. For example, it doesn't make sense if you place Alert Me option with Edit in Datasheet option. Does it make sense to have this option with Datasheet option? Answer is absolutely no.

But this is just for fun purpose and also to give you an idea about how to do that. Before we actually go in to the code, I would like to share here that each of these menu options fall under MenuGroupID.

First observe the below figure closely. See Red circle, Bur circle and green circle.


Now see the below image of menu items


See, There is only one red circle because see the first category. We have only one single item here which is EditInDatasheet. See two blue circles, we have two items in the menu category (Export to Spreadsheet and Open with Access) and last we have again two circles shown in green color represents last two options. (View RSS Feed and Alert Me). As you can see all belongs to MenuGroupId. First item has id number 200; second two items have id number 400 and last two items have id number 500.

So now we will play the trick and we will move View RSS Feed with EditinDatasheet. All we need to do is just change the MenuGroupId of RSS Feed from 500 to 200 so that it will come with ExportinDatasheet.

foreach (Control childControl in ParentControl.Controls)
{

if (childControl.ToString().ToUpper() == "Microsoft.SharePoint.WebControls.ActionsMenu".ToUpper())
{

ActionsMenu Menu = (ActionsMenu)childControl;
Menu.Visible = true;

if (Menu.GetMenuItem("ViewRSS") != null)
{
Menu.GetMenuItem("ViewRSS").MenuGroupId = 200;
}

break;
}
CheckControl(childControl);
}


See the effect of this code,


If we want View RSS Feed to appear first and Datashet option to come second, then just a little modification will do this for us. We only need to add one single line only.

if (Menu.GetMenuItem("ViewRSS") != null)
{
Menu.GetMenuItem("ViewRSS").MenuGroupId = 200;
Menu.GetMenuItem("ViewRSS").Sequence = 0;
}

This is the way you can change the menu item from one place to the other place.

Now how about adding a menu item template to Menu? Let us go ahead and add menu item template to the Actions menu.

MenuItemTemplate objTemplate = Menu.AddMenuItem("MailMeID", "Mail Me From Hotmail",
"/_layouts/images/SPSPROFL.GIF",
"This will take you to hotmail", "", strClientURL);

objTemplate.MenuGroupId = 200;


Once you click on this item, it will take you to hotmail.com. Ok, now how about adding a client side code to it? As you can see in my previous code, I kept the last parameter blank. That is where we need to right the client event.

Just to demonstrate you, I have used the built in Client Click of RSS feed and assigned it to our new menu item.


if (childControl.ToString().ToUpper() == "Microsoft.SharePoint.WebControls.ActionsMenu".ToUpper())
{
ActionsMenu Menu = (ActionsMenu)childControl;
Menu.Visible = true;
string strClientURL = "window.location = '/sites/Test/_layouts/listfeed.aspx?List=%7BA6B5F63B%2DB860%2D418F%2DBEB0%2D8DAFC72C1C6B%7D';";
MenuItemTemplate objTemplate = Menu.AddMenuItem("MailMeID", "Mail Me From Hotmail",
"/_layouts/images/SPSPROFL.GIF",
"This will take you to hotmail", "", strClientURL);


objTemplate.MenuGroupId = 200;

break;
}


You can change this url to your desired page in the site. Once you click on Mail me from Hotmail, it will take you to RSS Feed page.

If you add one more single line of code which is shown below, we get that new menu item with separator. It separates it with the other menu items with one line. Note that we have commented the MenuGroupID assignment, so that it becomes a separate group.

if (childControl.ToString().ToUpper() == "Microsoft.SharePoint.WebControls.ActionsMenu".ToUpper())
{

ActionsMenu Menu = (ActionsMenu)childControl;
Menu.Visible = true;

string strClientURL = "window.location = '/sites/Test/_layouts/listfeed.aspx?List=%7BA6B5F63B%2DB860%2D418F%2DBEB0%2D8DAFC72C1C6B%7D';";

MenuItemTemplate objTemplate = Menu.AddMenuItem("MailMeID", "Mail Me From Hotmail",
"/_layouts/images/SPSPROFL.GIF",
"This will take you to hotmail", "", strClientURL);

Menu.AddMenuItemSeparator();

//objTemplate.MenuGroupId = 200;

break;
}


Ok, now once again let us get the DesigntimeHTML and see what the new things that we have got,


Check out the new menu item added. I have highlighted it with blue underline and also see the new MenuGroupID that we got. It is 2147483647. So now we know that if any other menu item we want to add with the same group, we need to assign this number to the new MenuItemtemplate as we saw in the beginning of this post.

I am finding more interesting about this, I will be eager to share it with you all-time supportive readers.

Copying users from user profile to site users

Copying users from user profile to site users

Hi All,

One fine day I woke up and thought of doing some small code on user profile. Then I decided to copy all users from user profile to one site. Just for knowledge purpose and it worked. So I am going to show the steps to achieve this in this post.

Keep in mind that I've done it on my server only and I developed Windows Application to achieve this.

First, taken an object for your web in which you want to copy users.

You will need these references of assemblies.

using System;
using System.Windows.Forms;
using Microsoft.Office.Server.UserProfiles;
using Microsoft.Office.Server;
using Microsoft.SharePoint;

and thenwriten down the following code. Just make sure that you have administrative rights to perform this operation.

SPSite objSite = new SPSite("{site URL}");
//Then obtain server context,
ServerContext svrContext = ServerContext.GetContext(objSite);
//Take User profile object
UserProfile myProfile = null;
UserProfileManager profileManager = new UserProfileManager(svrContext);
//Open the web.
SPWeb web = objSite.OpenWeb();

web.AllowUnsafeUpdates = true;

//Navigate through each user profile in profile manager
//and then add the users to the site with its login name.

foreach (UserProfile userprofile in profileManager)
{
if (profileManager.UserExists(userprofile.MultiloginAccounts[0]))
{
web.SiteUsers.Add(userprofile.MultiloginAccounts[0], "", "", "");
}

}

web.Update();
web.AllowUnsafeUpdates = false;


After performing this operation, just wait for some time. This is because initially you may see users Account name as DomainName\UserName, However after some time, These user names will be converted to the Actual user names.(the one that we see after welcome {user name} on top right corner).

Hope this will help.

Designing anonymous application page in SharePoint

Designing anonymous application page in SharePoint

Hi All,

Today I am going to discuss on how to design anonymous access application page. This is a common problem that many company developer faces. They always ask that designing such a page is always difficult. You will have site running in windows authentication or in forms authentication. If the entire site is anonymous then it is altogether a different story.

So let us discuss how we can design such application page that can be accessed by the anonymous users as well.

Normally we inherit the application page by LayoutPageBase class, right? Yes, so first thing to note is instead of inheriting from this class, we are required to inherit from class named UnsecuredLayoutsPageBase.

In addition to this, you also need to override one more method which is

protected override bool AllowAnonymousAccess
{
get
{
return true;
}
}


Once you are done with these two settings, you are done with this. Try to achieve this and let me know your feedback.

Thank you

Save Conflict / Recursive call of event handler / Update item in item updating and adding

Save Conflict / Recursive call of event handler / Update item in item updating and adding


Microsoft.SharePoint.SPException: Save Conflict
Your changes conflict with those made concurrently by another user.
If you want your changes to be applied, click back in your Web browser, refresh the page, and resubmit your changes.

This post is also solution of
Recursive call of event handler and update item in item updating and adding

Once I was suffering from "Save Conflict" error while updating a List item.
This thing happens when to achieve two of my business requirements.

Scenario 1:
In my scenario I have a workflow attached with the list. While adding or updating item from this list, by default workflow is attached to the list. Now as per my requirement. On workflow activated and on task generated again I want to fill one field in the same list. I got "Save conflict" error while updating that list item from workflow.

Scenario 2:
In one of my list in item handler I'm creating a sub site with the Title of the item. What I want to do is that in item added I want to update the list field. But while updating I'm having this "save conflict" error.

So in both the case what I found was that when we are calling
ListItem.Update();
method, list's ItemUpdating event fires and again all the procedure go in to the recursive loop.
To solve this problem try one of these code snippets.

1) (useful while updating List/web from outer side of the scoop of that web or site)
web.AllowUnsafeUpdates = true;
ListItem.SystemUpdate(false);
or
ListItem.Update();
web.AllowUnsafeUpdates = false;
//must set AllowUnsafeUpdates to false if we are set it to true.

2) (Usefull in from updating Item from event handler)
Item[FieldName] = FieldValue;
this.DisableEventFiriing();
item.SystemUpdate(false);
or
item.Update();
this.EnableEventFiring();
//must enable event firing if we are disable it


hopefully this post will help you guys for solving your problem.

Cheers.

Change Display Name of the column using JavaScript in New/Edit Form in SharePoint

Change Display Name of the column using JavaScript in New/Edit Form in SharePoint


<script type="text/javascript">
 

// this is default SharePoint function

//it will call after page is loaded.

_spBodyOnLoadFunctionNames.push("split");
 

//this function finds all &lt;nobr&gt; tag

//then check our original text and

//replace new text which contains <br>

function split()

{

var oP = document.getElementsByTagName('nobr');//the collection of <p> tags

for(var i=0;i&lt;oP.length;i++)

{

//alert(oP[i].innerHTML);

if(oP[i].innerHTML == "Location change Comments" || oP[i].innerHTML == "New Adjacencies Comments" || oP[i].innerHTML == "MD Presentation Comments"|| oP[i].innerHTML == "Product Missing From Floor Comments" || oP[i].innerHTML == "Overall Stock Issues Comments"|| oP[i].innerHTML == "Overall Quality of Visit Comments" || oP[i].innerHTML == "Overall Interaction with Management Comments")

{

oP[i].innerHTML = "Comments"

}

}

}

</script>

Original Post

Sunday, March 7, 2010

Hide column header in a SharePoint list web part

I was working on a site today and I added a list web part to the site. I wanted the information to be displayed in two columns so I created a new view using "Boxed, no labels" as the style for the view. The only problems was the column headers that end up at the top that really don't make any sense or line up with anything.

To remove these annoying headers I used a simple content editor web part. Instead of using the rich text editor, open up the Source editor and enter the following three lines:view source

print?


<style>

.ms-viewheadertr { display: none;}

</style>

Under Layout in the Content Editor Web Part check the "Hidden" check box so you're web part wont' be seen on your site and click OK. The column headers will now be hidden from view.


This method can also be used to hide and/or change the look of other aspects of your SharePoint site without using SharePoint Designer or making any custom modifications. Any change can easily be undone or changed by going into Page Edit mode and changing the source in the web part.

Wednesday, March 3, 2010

JQuery for Everyone: Pre-populate Form Fields

Power Users often request the ability to pre-populate form fields. The most straight-forward approach involves passing form field values in the URL as a query string. A while ago, the SharePoint Designer bloggers posted a solution with POJ (plain old JavaScript). Since I'm on a roll, I figured it was time to update this script with some jQuery goodness.

Why This Works Better

This script requires no configuration. Drop it on the page and start passing query string values to the form. The original script required configuration to make it work with specific form fields.

What Kind of Data

So far, I've tested this with Text, Rich Text, Numbers, Dates, Date/Time, People, and Choice/Lookup. If you have a test that doesn't work, please comment this thread.

But Browser Differences Will Break It, Right?

Again, I've tested and accounted for the variance in displays of FF3 and IE7. Date/Time and People are the main bad guys since FF3 is told to ignore the picker controls.

How Do We Use It?

First, copy the code and put it in a Content Editor Web Part on your form. Since most forms don't allow the Edit mode naturally, I've kept the URL string you need in the first comment of the code.

Next, start adding to the URL (before the first parameter use ?, subsequent parameters all use & before them), for example:

  • Data Type:Text, string:Title=abc123, examples:
    • http://servername/site/Lists/listname/NewForm.aspx?Title=abc123
    • http://servername/site/Lists/listname/EditForm.aspx?ID=1&Title=abc123
    • http://servername/site/Lists/listname/EditForm.aspx?ID=1&Description=<b>bold text</b>
  • Data Type:Date, string:Due Date=1/1/2010, examples:
    • http://servername/site/Lists/listname/NewForm.aspx?Due Date=1/1/2010
    • http://servername/site/Lists/listname/NewForm.aspx?Due Date=1.1.2010
    • http://servername/site/Lists/listname/NewForm.aspx?Due%20Date=1-1-2010
  • Data Type:Date/Time, string:Start Date=1/1/2010 10:30 pm, examples:
  • Note: Because the interface uses a drop-down in 5 min increments, you must pass a time ending in 0 or 5.
    • http://servername/site/Lists/listname/NewForm.aspx?Due Date=1/1/2010 1:30 PM
    • http://servername/site/Lists/listname/NewForm.aspx?Due Date=1.1.2010 01:30 AM
    • http://servername/site/Lists/listname/NewForm.aspx?Due%20Date=1-1-2010%2010:30 pm
  • Data Type:Radio/Checkbox, string:MyChoice=1, examples:
    • http://servername/site/Lists/listname/NewForm.aspx?MyChoice=true
    • http://servername/site/Lists/listname/NewForm.aspx?MyChoice=TRUE
    • http://servername/site/Lists/listname/NewForm.aspx?MyChoice=1
    • http://servername/site/Lists/listname/NewForm.aspx?MyChoice=0
    • http://servername/site/Lists/listname/NewForm.aspx?MyChoice=false
    • http://servername/site/Lists/listname/NewForm.aspx?MyChoice=FALSE
  • Data Type:Lookup/Select, string:MySelect=@1, examples:
  • Note: You can use either the ID value or the text value. In a single select control, using the text will select the first match.
    • http://servername/site/Lists/listname/NewForm.aspx?MySelect=@1
    • http://servername/site/Lists/listname/NewForm.aspx?MySelect=Text for ID1
  • Data Type:Multi-select Lookup/Select, string:MySelect=abc123,@1,abc,@2 examples:
  • Note: You can use either the ID value or the text value. Text parameters can match multiple options. Separate options by comma.
    • http://servername/site/Lists/listname/NewForm.aspx?MySelect=a,b,c
    • http://servername/site/Lists/listname/EditForm.aspx?ID=1&MySelect=@1,@2,@3
    • http://servername/site/Lists/listname/EditForm.aspx?ID=1&MySelect=@1,@2,@3,a,b,c
  • Data Type:People-Picker, string:Assigned To=pgrenier, examples:
  • Note: Previous versions of a prepopulate script could not populate multiple people-picker controls because they have the same title, "People Picker," however this script works with the column title.
    • http://servername/site/Lists/listname/NewForm.aspx?Assigned To=SP\pgrenier
    • http://servername/site/Lists/listname/EditForm.aspx?ID=1&Assigned%20To=pgrenier

view source

print?

001

<script
type="text/javascript">

002

//?PageView=Shared&ToolPaneView=2


003

if(typeof jQuery=="undefined"){

004

    var jQPath="http://ajax.googleapis.com/ajax/libs/jquery/1.3.2/";


005

    document.write("<script
src='",jQPath,"jquery.min.js'
type='text/javascript'><\/script>");

006

}


007

</script>

008

<script
type="text/javascript">


009

/*

010

 * Prepopulate form fields in SharePoint


011

 * Copyright (c) 2008 Paul Grenier (endusersharepoint.com)

012

 * Licensed under the MIT (MIT-LICENSE.txt)


013

 */

014

(function(){


015

    var params = window.location.search.substring(1).split("&"),

016

        kv = {},


017

        opts,

018

        sp=/%20|\+/g,


019

        datetime=/([1-9]|0[1-9]|1[012])[\-\/.]([1-9]|0[1-9]|[12][0-9]|3[01])[\-\/.](19|20)\d\d\s([0-1][0-2]|[0-9]):([0-9]{2})\s(A|P)M/i,

020

        date=/([1-9]|0[1-9]|1[012])[\-\/.]([1-9]|0[1-9]|[12][0-9]|3[01])[\-\/.](19|20)\d\d/,


021

        clean = function(str){

022

            return str.replace(sp," ");


023

        },

024

        getKv = function(){


025

            $.each(params,function(i,e){

026

                var p=e.split("=");


027

                kv[p[0]]=decodeURIComponent(p[1]);

028

            });


029

            return kv;

030

        };


031

    jQuery.prepop = function(){

032

        $.each(getKv(),function(k,v){


033

            k=clean(k);

034

            v=clean(v);


035

            var f=$("[title='"+k+"']"),

036

                job;


037

            if (f.length>0){

038

                if (f[0].type=="text"){job=10;} //text


039

                if (f[0].type=="checkbox"){job=20;} //checkbox

040

                if (f[0].tagName=="SPAN"&&f.hasClass("ms-RadioText")){job=30;} //radio


041

                if (f[0].type=="select-one"&&f[0].tagName=="SELECT"){job=10;} //choice and non-IE lookup

042

                if (f[0].tagName=="TEXTAREA"){job=10;} //textarea


043

                if (f[0].type=="text"&&f[0].opt=="_Select"){job=70;} //IE lookup

044

                if (v.match(date)){job=40;} //date


045

                if (v.match(datetime)){job=50;} //datetime

046

            }


047

            if (f.length===0){

048

                var elm = $("nobr:contains('"+k+"')");


049

                if (elm.length>0){

050

                    elm = elm.parents("td").next()[0];


051

                    var s1 = $(elm).find("select:first"),

052

                        s2 = $(elm).find("select:last"),


053

                        p1 = $(elm).find("textarea[title='People Picker']"),

054

                        p2 = $(elm).find("div[title='People Picker']"),


055

                        vals = v.split(",");

056

                    if (s1.length>0){job=80;} //multi-select


057

                    if (p1.length>0){job=90;} //people picker

058

                }


059

            }

060

            switch (job){


061

            case 10:

062

                if (v.substring(0,1)=="@"){


063

                    opts = f[0].options;

064

                    $.each(opts,function(i,e){


065

                        if (opts[i].value==v.substring(1)){f[0].selectedIndex=i;}

066

                    });


067

                }else{

068

                    f.val(v);


069

                }

070

                break;


071

            case 20:

072

                if (v.toUpperCase()=="TRUE"||v=="1"){f[0].checked=true;}


073

                if (v.toUpperCase()=="FALSE"||v=="0"){f[0].checked=false;}

074

                break;


075

            case 30:

076

                if (v.toUpperCase()=="TRUE"||v=="1"){f.find("input:radio").click();}


077

                break;

078

            case 40:


079

                v=v.replace(/[\-\/.]/g,"/");

080

                f.val(v);


081

                break;

082

            case 50:


083

                var dt=v.split(" "),

084

                    d=dt[0].replace(/[\-\/.]/g,"/"),


085

                    t=dt[1],

086

                    hm=t.split(":"),


087

                    hh=hm[0].replace(/^0/,""),

088

                    mm=hm[1],


089

                    ap=dt[2].toUpperCase();

090

                f.val(d);


091

                f.parent("td").siblings("td.ms-dttimeinput")

092

                    .find("select:first").val(hh+" "+ap)


093

                    .parent("td").find("select:last").val(mm);

094

                break;


095

            case 70:

096

                if (v.substring(0,1)=="@"){


097

                    ShowDropdown(f[0].id);

098

                    opts = $("#_Select")[0].options;


099

                    $.each(opts,function(i,e){

100

                        if (opts[i].value==v.substring(1)){$("#_Select")[0].selectedIndex=i;}


101

                    });

102

                    f.blur();


103

                }else{

104

                    f.val(v);


105

                    ShowDropdown(f[0].id);

106

                    f.blur();


107

                }

108

                break;


109

            case 80:

110

                opts = s1[0].options;


111

                $.each(vals,function(i,e){

112

                    var V=e;


113

                    $.each(opts,function(i,e){

114

                        if (opts[i].text==V){


115

                            s2.append("<option
value='"+opts[i].value+"'>"+V+"</option>");

116

                        }


117

                        if (V.substring(0,1)=="@"){

118

                            if (opts[i].value==V.substring(1)){


119

                                s2.append("<option
value='"+V+"'>"+opts[i].text+"</option>");

120

                            }


121

                        }

122

                    });


123

                });

124

                break;


125

            case 90:

126

                var p=vals.join(";");


127

                p1.val(p);

128

                p2.html(p);


129

                break;

130

            //default:


131

            }

132

        });


133

    };

134

})();


135

$(function(){

136

    $.prepop();


137

});

138

</script>